domingo, 13 de febrero de 2011

Remote Assistence

Remote Assistance, is that kind of help which a person as help desk, can make to a user and his computer without the physical presence and try to solve some computer problems remotely. In the long term is a great support for technician, because it saves travel time and expense of tranport, even if it's a bigger problem, it's needed physical presence of the technician.

For this activity, we have many programs that help make this work. For example:
 
  • LogMeIn: Allows you to remotely access your PC, or that of any known or client that needs assistance, in a practical and easy way. Once connected to the remote computer, you can control its mouse and keyboard, but also has useful tools like a "laser" to denote a position; and a board, for type directly on the remote PC desktop.
Its full menu control is managed completely via browser (tested in Firefox and Internet Explorer) that you can even access from a Pocket PC with an Internet connection.


  • TeamViewer: a remote control application that focuses on use facility. Every computer that is running TeamViewer, besides performing as a server, can connect to another and get an interactive view of the other PC desktop.
TeamViewer options allow you  to set a permanent password and sveral parameters for additional security. The connection, thanks to 256-bit AES encryption, is safe in most situations. As for TeamViewer image quality it depends, after all, of speed connection between computers.

TeamViewer doesn't require additional components and executes quickly, even on humble computers.


These are some of the most popular programs for remote assistance, but there are more and in a big amount, but ranges from user to user which is used.


To learn more about LogMeIn, click here.
And for more info. about TeamViewer, click here.

sábado, 12 de febrero de 2011

Making of a LAN (Local Area Network) in Windows XP.

To carry out this activity, you will need:


  • 1 network card in each PC.
  • An RJ45 crossover cable.
  • And of course, a RJ45 UTP cable tester to check out whether the cable is correct.

Connect the wire's ends in each of the network cards (specifically in the female port RJ45) and verify that the port's LEDs be switched on, this on both PC's.

If all goes well, let's start.


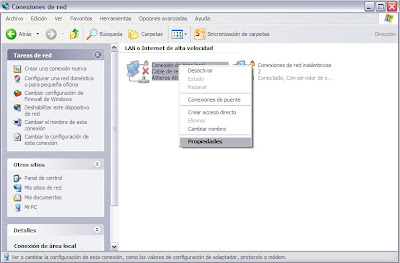
  • Open the Control Panel, double click "Network Connections" then right click on "Local Area Connection"and select "Properties. "


  • Now set up  the IP address of each PC, select the "Internet Protocol TCP / IP" then select "Properties. " Each PC must assign an IP address, this can be done automatically or manually preference. Usually they assign these addresses:


PC1
IP Address: 192.168.0.1
Subnet Mask: 255.255.255.0 (appears automatically)

PC2
IP Address: 192.168.0.2
Subnet Mask: 255.255.255.0 (appears automatically)


  • Now we see that the two PC's actually belong to the same workgroup. To do this, right click on My Computer and select Properties.

In the
"Computer Name" tab, you will see the computer name and the workgroup in which it's located. Click "Network ID" to modify the workgroup, it is preferable that two PCs are in the same workgroup.


  • The next step is to check that the two PCs to communicate well. To do this, open the command prompt (MS-DOS window to win 98): Go to Start / Run and type "cmd" (without quotes)

On PC1, type the command ping 192.168.0.2, so you can check if PC1 sees PC2. In PC2, type the command ping 192.168.0.1, you can check the opposite of previous step.


  • The next step is to share folders on each PC, right click on the folder you want to share, select "Share", assign a name to the folder that will be seen on the net.
  • Right click on the icon "My Network Sites" on the desktop, then select "Explore"(Note: There is a difference between Explore and Open), click on "All Network", then the working groupso you'll can see the PCs as well as all folders and files they share.

And that's all, let's start to share data!


If you want to see the Spanish article, click here.

Wake On Lan

Wake on Lan, also known as WOL, is a technology through which a computer that is turned off, can be switched on from another PC on the LAN (local area network).

How does it work mainly?

When your computer is turned off completely, network card is totally shut down, too. Software (WOL) sends a signal to the PC and the network card, which is connected to the motherboard, turn on the PC. It should be noted that only serves to turn on, not turn off. If yor want to shut down the computer, do it with the Remote Administrator.

How is it used ?

1 .- First, connect the network card to the motherboard via a WOL cable. Both the network card and the motherboard must be prepared for this technology. This cable usually comes included in the network cards. To find the exact place where you should connect the cable, should be consulted in the manuals of both devices, but will be a small 3-pin connection to put WOL in both the motherboard and in the network card.


2 .- Once connected, you must enter the system BIOS and enable it (usually to be found in the Power management section of BIOS). To enter the BIOS press the Delete key (this may vary in each PC, so it is recommended to see the beginning of the boot, which key allows access to the BIOS) after turning on the PC.

3 .- Now you need software to send a signal to turn the PC off (on the internet, there are several programs that do it, it's decition of the user, to choose the one that offers thye best options) On the PC that will be swicth on, it's no need to install any software, this is for the LAN's PC from which you will turn on the other PC (which sends the signal).

4 .- Before everything, just one thing. A computer on a LAN has an IP address (example 172.26.0.3) and netmask (usually 255.255.255.0). But each network card has a hardware address called MAC (example 00-05-04-37-F6-1). This address can't be changed and it's unique to each network card, also they are pairs of hexadecimal numbers which are equivalent to zeros and ones, don't be surprised if there are lyrics. Knowing the IP of a PC, you can easily find the MAC address. Then we need to know the PC's MAC we are going to turn on. To find it out, on the PC that's going to be turned on, you do the following:

In Win9x put Start / Run / winipcfg and displays a window with the IP and so on, click on "show all the data" and displays the MAC, type and save it.

In Windows NT/2K/XP give to Start / Programs / Accessories / Command Prompt will open an MS-DOS type window, type ipconfig / all, will show all LAN's data including the MAC, type it down.

5 .- Manage the software. We already have the MAC of PC that we will turn on. Teach with a little program here, the first of Step 3. LANStartCMD.exe file, that runs on an MS-DOS window type. It's use like this: "LANStartCMD.exe 00-05-04-37-F6-1a", typing that  the PC should turn on. But also in the. zip comes a program, "start.bat", that if you edit it (right-click over it and click Edit) and substitute the MAC address that is already there by the other one we want to use, you won't needto type anything, just a double clik and the PC will be switch on. 


What is its exact operation?

When the system is turned off, the network card uses an alternative power supply to monitor the network and expect to send a package from the server, this energy is provided by the motherboard to the card through the cable. The tension provided by the power supply is 5V (volts) and low amperage when it's on standby mode. Once it receives this package, the network card send a pulse to the other PC for switchin on. Summarizing, to make this system working on, it must have an ATX motherboard that supports this feature, because computers with AT motherboards, can't be turned off remotely, in fact that it isn't stay in standby mode. 

If you want to see the Spanish article, click here.